
Here at IPAT, I’ve visited with countless individuals experiencing low vision caused by a wide variety of diseases including macular degeneration, retinitis pigmentosa, cataracts, and glaucoma. With that, I’ve recognized a common pattern in relation to goals individuals with low vision hope to accomplish during their time with me.
High on that list of goals includes:
- The ability to read print material such as the newspaper, books, mail, and hand-written notes.
- The ability to see and recognize faces in pictures of family and friends.
- The ability to partake in leisure time activities such as browsing Facebook, watching Netflix, or playing games.
While discussing assistive technology (AT) to enhance low vision, I usually introduce the iPad. With its numerous built-in accessibility features, the iPad is a portable and reasonably priced solution for helping individuals with low vision accomplish all of the goals mentioned above and more. During an iPad demonstration for low vision, I always show-off my 5 favorite iPad gestures. Check them out below!
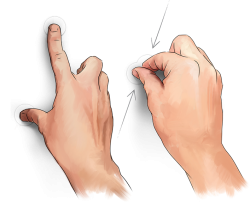
Gestures 1 and 2: Pinch In and Out to Adjust Screen Magnification!
These two gestures are a very simple way to magnify what you want to see on the iPad screen! Individuals simply use two fingers, usually their thumb and index finger, to magnify in and out of most web pages, photos, and applications. This is accomplished by placing your two fingers on the screen and spreading them apart to increase magnification, and closing them together to decrease magnification – hence the name, pinching in and out.
One of the best applications of both the pinch in and out gestures is found within the iPad’s camera. Individuals can take a picture of whatever they are trying to see or read and use the pinch in and out gestures to magnify the picture large enough to see clearly. The pinch in and out gestures work with most applications on the iPad, but not all. Watch the video below to see a demonstration of the two gestures, and a great example of how they may work seamlessly in one application but not so well the next. (And don’t worry. I have an alternative solution when the pinch in and out gestures aren’t working.)
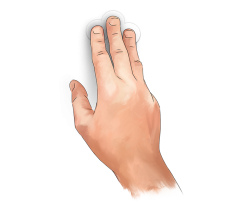
Gestures 3, 4, and 5: Zoom Accessibility!
These next three gestures are all part of the iPad’s Zoom accessibility feature. Straight from Apple’s website, “Zoom is a built-in magnifier that works wherever you are in iOS, from Mail and Safari to the Home and Lock screens. And it works with all apps from the App Store. A simple double-tap with three fingers instantly zooms in 200 percent, and you can adjust the magnification between 100 and 500 percent. While you’re zoomed in, you can still use all of the familiar gestures to navigate your device.” So basically, when you can’t pinch in and out, you can Zoom! (And yes, this is the solution I was referring to previously.)
Let’s learn the gestures:
- Double-tap three fingers to zoom. Basically, this gestures turns zoom on and off.
- Drag three fingers to move around the screen – self explanatory.
- Double-tap three fingers and drag to change the zoom. This gesture throws people off. To further explain the gesture, user’s must tap the screen with three fingers twice. On the second tap, three fingers remain on the screen. Then user’s push up or down the screen to increase and decrease the screen’s magnification. It sounds complicated, but its not. This gesture takes patience and practice.
http://youtu.be/5KnVBYDWlkQ?t=1m55s
These are a just a few of many doors the iPad can open for individuals with low vision. If you, or someone you know, might benefit from the use of an iPad feel free to contact IPAT to speak with an AT Consultant, set-up a demonstration, or rent a device.